3D Prinitng Problems & Solutions
3D printing has revolutionized the way we bring designs to life, unlocking endless possibilities for creativity and innovation.
However, like any advanced technology, it comes with its own challenges. From stringing and warping to filament running out and first-layer adhesion issues, 3D printing problems can be frustrating and time-consuming.
But don’t worry! In this article, we’ll list the most common 3D printing issues, their causes, and simple troubleshooting solutions to help you achieve better results. Let’s get started, avoid 3D printing failures, and create perfect prints today!
TOP 10 Problems & Solutions
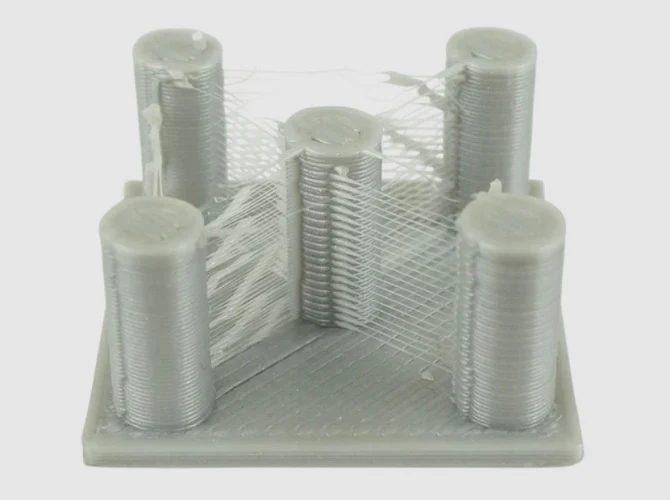
3D Print Stringing
3D print stringing, also known as oozing or webbing, is a common 3D printing issue that leaves unwanted thin strands of filament between parts of your 3D print. This can result in messy prints and a reduced quality of the finished model.
How to Fix Stringing in 3D Printing?
Keep Filament Dry:
Store filament in cool and dry places.
If the filament has absorbed moisture, use a filament dryer or bake it in an oven at a low temperature to remove water content. Check out our guide on how to dry filament for more detailed information.
Optimize Nozzle Temperature:
Check the manufacturer’s recommended temperature range for your filament.
Lower the nozzle temperature by 5–10°C if stringing persists, ensuring the filament isn’t overly fluid.
Adjust Retraction Settings:
Increase the retraction distance by 1–2 mm from the default setting to pull the filament back into the nozzle during movement.
Raise the retraction speed by 10–20 mm/s to expedite filament withdrawal, reducing excess molten plastic.
Control Printing Speed:
Fine-tune the printing speed to find a balance where the filament has enough time to solidify without compromising print quality.
Test different speeds to minimize stringing while maintaining a smooth surface finish.
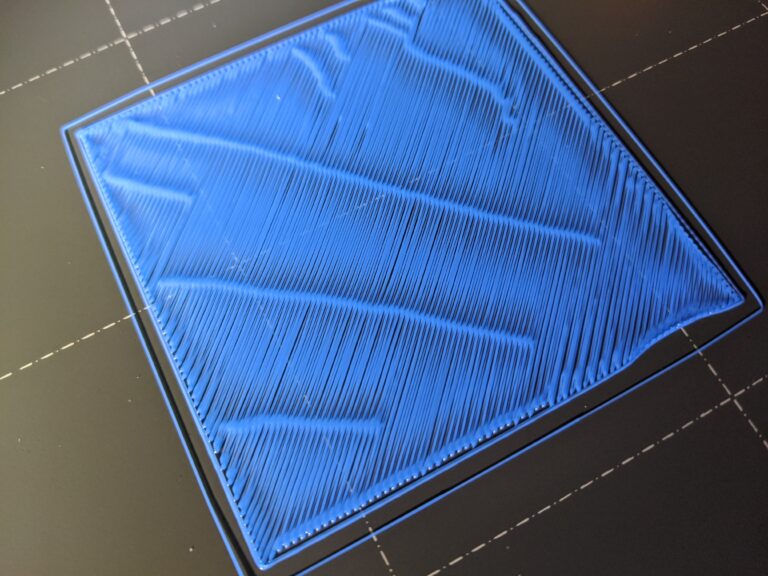
3D Print Warping
3D print warping is a common issue in Fused Deposition Modeling (FDM) that causes parts to deform, particularly at the base, where corners can curl upwards and detach from the print bed.
How to Avoid and Fix Warping in 3D Printing?
Use Warp-Resistant Materials:
Opt for materials like PLA or PETG, which are less prone to shrinkage and warping due to their lower melting points and better adhesion properties.
Improve Bed Adhesion:
Apply adhesive solutions such as glue sticks, hairspray, or specialized 3D printing adhesives.
Clean the print bed thoroughly before and after each print to ensure a consistent bond.
Control the Print Environment:
Use an enclosed print chamber to maintain consistent temperatures during the printing process.
Adjust cooling fan speeds to prevent aggressive cooling that could contribute to warping.
Adjust Printing Parameters:
Use a heated build plate set to the recommended temperature for your filament type to improve adhesion.
Adjust settings such as print speed and cooling fan speed to further minimize 3D printing wrapp
Clogged Nozzle
One of the most frustrating issues in 3D printing is clogged nozzle which occurs when material obstructs the flow of filament through the printer’s nozzle. This can result in poor-quality prints, complete print failure, or even cause damage to the printer if not resolved promptly.
How to Fix 3D Printer Clogged Nozzle?
Perform a Cold Pull:
Heat the nozzle to the recommended temperature for the filament.
Insert and extrude the filament until it flows freely.
Allow the nozzle to cool slightly, then pull the filament out to remove debris. Repeat as necessary.
Use a Needle or Cleaning Tool:
Gently insert a 4mm thin cleaning needle into the nozzle to dislodge blockages.
Be careful not to damage the nozzle’s interior.
Disassemble and Manually Clean:
Remove the nozzle from the printer.
For ABS residue, soak the nozzle in acetone. For other filaments like PLA or PETG, heat the nozzle. Then use a cleaning filament or a soft wire brush to remove residue.
Reinstall the cleaned nozzle after ensuring it’s completely dry.
Inspect the Extruder:
Check the extruder gear for dirt or filament debris that may cause inconsistent feeding.
Clean or replace damaged extruder components as needed.
First Layer Issues
The first layer of a 3D print is crucial for ensuring the success of the entire print. The first layer issue, either messy or uneven first layer, can lead to adhesion issues, poor print quality, or even complete 3D print failure.
How to Troubleshoot 3D Printing First Layer Issues?
Level the Print Bed:
Use the printer’s manual or auto-leveling feature to ensure the bed is perfectly level.
Double-check bed leveling periodically, especially before important prints.
Adjust the Z-Offset:
Fine-tune the nozzle height to be close enough to the bed for proper adhesion without over-squishing the filament.
Test by printing a single layer and observing the filament’s behavior.
Improve Bed Adhesion:
Clean the bed with isopropyl alcohol to remove dust or oils.
Use adhesion aids such as glue sticks, and painter’s tape.
Check Extrusion Consistency:
Verify the extruder is calibrated and extruding at the correct rate.
Optimize Printing Speed and Temperature:
Print the first layer slower than subsequent layers to ensure proper placement and adhesion.
Use the recommended bed and nozzle temperatures for the filament being used.
Use a Raft or Brim:
Add a raft or brim in your slicer settings to improve the adhesion of the first layer and stabilize the print.
Layer Shifting
Layer shifting occurs when layers in a 3D print are displaced horizontally, resulting in misaligned or distorted models. This issue affects both the appearance and functionality of the final 3D printing product.
How to Fix 3D Printer Layer Shifting?
Check and Tighten Belts:
Inspect the X and Y belts for proper tension; they should feel firm without sagging.
Replace any worn, frayed, or damaged belts.
Monitor Stepper Motor Performance:
Replace stepper drivers or motors if they frequently skip steps or fail.
Reduce Print Speed:
Lower the printing speed to reduce strain on the motors (reducing by 20% to 60%).
Prevent Collisions:
Ensure the print bed and previous layers are level and free of warping.
Enable “Z-hop” during travel moves to prevent the nozzle from dragging over the print.
Inspect Mechanical Components:
Tighten all screws, bolts, and fasteners in the frame and moving parts.
Check rods and bearings for wear or misalignment; replace if necessary.
Lubricate moving parts to ensure smooth operation.
Stabilize the Printer:
Place the printer on a stable, vibration-free surface, such as a heavy, sturdy table or workbench.
Messy Overhangs
Overhangs in 3D printing refer to parts of the design that extend out horizontally without direct support beneath them. When not properly managed, overhangs can result in messy, droopy, or stringy layers that compromise the quality of the print.
How to Fix Messy Overhangs in 3D Printing?
Optimize Cooling System:
Use a well-functioning cooling fan directed at the print.
Adjust fan speed settings in your slicer for better control during overhang printing.
Reduce Overhang Angle:
Modify the design to minimize overhang angles greater than 45 degrees.Or use supports for those angles greater than 45 degrees.
Incorporate gradual slopes instead of sharp overhangs where possible.
Lower Printing Temperature:
Reduce the nozzle temperature within the recommended range for the filament.
Experiment to find a balance between flowability and layer adhesion.
Reduce Print Speed:
Lowering the speed for overhang areas gives the filament more time to cool and reduces the risk of sagging.
In your slicer software, look for a setting specifically for overhang printing speed. If not available, you can reduce the overall printing speed when you know a model has significant overhangs.
Use Supports:
Use supports in your slicer for extreme overhangs to provide temporary scaffolding.
Experiment with different support patterns for easier removal post-print.

Supports Falling Apart
Support structures in 3D printing are essential for models with overhangs or complex geometries. When supports fail or fall apart, it can lead to poor print quality or incomplete models.
How to Fix 3D Printing Supports Falling Apart?
Ensure Proper Bed Adhesion:
Use adhesion aids like glue sticks, painter’s tape, or a heated bed.
Level the bed correctly and ensure the first layer adheres well.
Increase Support Density:
Raise the support density in your slicer settings to make them sturdier.
Test with moderate density levels (e.g., 15–25%) to balance strength and ease of removal.
Optimize Support Placement:
Use slicer tools to manually place supports in critical areas.
Adjust overhang angles to ensure supports are generated where needed.
Select the Right Support Pattern:
Tree supports are often more stable and use less material for complex models.
Lower Print Speed for Supports:
Reduce the speed for support printing to improve layer bonding and stability.
Check Overhang Angles:
Incorporate chamfers or fillets into the design to lessen reliance on supports.
Improve Support Material Settings:
Adjust the extrusion width and layer height for supports to ensure adequate strength.
Use a slightly higher extrusion multiplier for support structures. write it again just copy

Blobs and Zits
During 3D printing, the extruder stops and starts as it moves, which can cause small surface marks—known as blobs or zits—where the nozzle begins or ends a print path. These occur when starting or stopping extrusion on the outer shell. While some marking is unavoidable, Simplify3D offers tools to help reduce their visibility.
How to Fix 3D Printing blobs and zits?
Fine-Tune Retraction and Restart Settings
If you see blobs right at the start of a perimeter, your extruder may be pushing out too much plastic. Reduce the “Extra Restart Distance” with a small negative value (e.g. -0.2mm) to fix over-priming after retraction.
Use Coasting to Relieve Nozzle Pressure
Blobs at the end of a perimeter are often caused by leftover pressure in the nozzle. Enabling “Coasting” tells the printer to stop extruding slightly before the end. Try a value between 0.2–0.5mm to reduce these blemishes.
Avoid Unnecessary Retractions
Retracting too often can create print defects, especially with Bowden extruders. Enable “Only retract when crossing open spaces” and “Avoid crossing outline for travel movement” to reduce retractions and keep extrusion consistent.
Enable Non-Stationary Retractions
To prevent blobs from stationary retractions, activate “Wipe Nozzle” with a distance of around 5mm, and turn on “Perform retraction during wipe movement.” This keeps the nozzle moving while retracting, reducing pressure buildup.

Gaps Between Infill and Outline
Each layer of a 3D print is made up of outer perimeters and inner infill. If these sections don’t bond properly, you might notice small gaps where they meet. This can be caused by settings related to overlap or print speed, and can be improved with a few simple adjustments.
How to Fix gaps between infill and outline?
Fine-Tune Retraction and Restart Settings
If you see blobs right at the start of a perimeter, your extruder may be pushing out too much plastic. Reduce the “Extra Restart Distance” with a small negative value (e.g. -0.2mm) to fix over-priming after retraction.
Use Coasting to Relieve Nozzle Pressure
Blobs at the end of a perimeter are often caused by leftover pressure in the nozzle. Enabling “Coasting” tells the printer to stop extruding slightly before the end. Try a value between 0.2–0.5mm to reduce these blemishes.
Avoid Unnecessary Retractions
Retracting too often can create print defects, especially with Bowden extruders. Enable “Only retract when crossing open spaces” and “Avoid crossing outline for travel movement” to reduce retractions and keep extrusion consistent.
Enable Non-Stationary Retractions
To prevent blobs from stationary retractions, activate “Wipe Nozzle” with a distance of around 5mm, and turn on “Perform retraction during wipe movement.” This keeps the nozzle moving while retracting, reducing pressure buildup.

Small Features Not Printed
3D printers are limited by nozzle size, typically 0.4mm or 0.5mm in diameter. Features smaller than this may not appear in the print or the Simplify3D preview. If you’re trying to print thin walls or fine details, here are a few effective solutions.
How solve small features not printed?
Enable Single Extrusion Walls
In Advanced Settings, set External Thin Wall Type to “Allow single extrusion walls.” This lets the printer use a single line of extrusion to print thin features that are too narrow for regular extrusion.
Redesign for Thicker Features
If possible, adjust your 3D model in your CAD software to make small features wider than your nozzle size (e.g. >0.4mm). Reimport the updated model into Simplify3D to confirm it’s now printable.
Use a Smaller Nozzle
Swap to a smaller nozzle (e.g. 0.3mm) to accurately print tiny details. Many printers support interchangeable nozzles—check your printer’s specs or manual for installation guidance.
